Week 6 of Configuration Management Systems course.
Course material: https://terokarvinen.com/2022/palvelinten-hallinta-2022p2/
Environment: Windows 11 laptop with 40 GB of free disk space.
Read and summarize
- Karvinen 2017: Vagrant Revisited – Install & Boot New Virtual Machine in 31 seconds (I recommend using
vagrant init debian/bullseye64as VM)
Vagrant requires only these three commands to get a machine up:
$ vagrant init debian/bullseye64
$ vagrant up
$ vagrant sshYou can setup two Virtual Machines to run on the same network but on different local IP addresses with one Vagrant script.
For basic master-slave architecture Salt implementation, install salt-master and salt-minion on the respective machines. Then edit the slave machine minion file at /etc/salt/minion. Add master: MASTER IP HERE and, if you want to, id: RANDOM NAME. Restart the minion service. Run salt-key -A (-A = accept keys) to accept the slave connecting to master. Now you can control the slave with the master.
Hello Vagrant
Objective: Install a Virtual Machine with Vagrant.
I downloaded Vagrant Windows AMD64 binary from the official website.
I ran the installer wizard with the default options and restarted my PC.
I opened Windows Powershell as administrator after searching for it in the start menu.
I created the folder structure for C:\users\valka\vagrant\debian with mkdir.
I created a new Vagrantfile.
> vagrant init debian/bullseye64vagrant init creates a new Vagrantfile and a specified I wanted preconfigured settings for Debian. Bullseye is the codename given to Debian version 11 and 64 refers to 64-bit version.
I created and started up the new Virtual Machine.
> vagrant upI was able to connect to the Virtual Machine via SSH.
> vagrant sshPrivate network
Objective: Install two Virtual Machines to the same network with Vagrant. Name one VM “isanta” and the other “renki1”. Test that “renki1” can connect to the “isanta” VM (ping or nc).
I created a new folder to C:\users\valka\vagrant\twohost.
I created a new Vagrantfile with vagrant init. I configured it to create two Virtual Machines with different local IP addresses. (Source: Tero Karvinen)
Vagrant.configure("2") do |config|
  config.vm.box = "debian/bullseye64"

  config.vm.define "isanta" do |isanta|
		isanta.vm.hostname = "isanta"
		isanta.vm.network "private_network", ip: "192.168.88.101"
	end

	config.vm.define "renki1", primary: true do |renki1|
		renki1.vm.hostname = "renki1"
		renki1.vm.network "private_network", ip: "192.168.88.102"
	end
end
I shutdown my previous machine just so it doesn’t run in the background.
> vagrant global-status
id       name    provider   state   directory
------------------------------------------------------------------------
7cf3167  default virtualbox running C:/users/valka/vagrant/debian

> vagrant halt 7cf3167
I created and started the two new Virtual Machines with vagrant up.
I listed all the Vagrant VMs with vagrant global-status.
I connected to “renki1” via SSH.
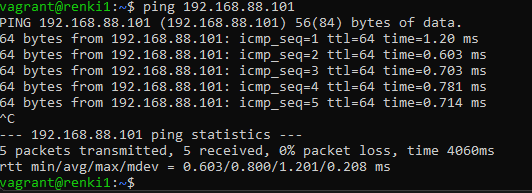
> vagrant ssh renki1I pinged “isanta” from “renki1” and got a response.
> ping 192.168.88.101Salt master-slave
Objective: Implement a master-slave architecture with Salt over a network. Set the previous assignment’s “renki1” as a slave to “isanta”.
While still connected to the previous assignments “renki1” Virtual Machine I updated packages and installed salt-minion.
$ sudo apt-get update
$ sudo apt-get install salt-minion
I modified /etc/salt/minion.
$ sudoedit /etc/salt/minion

# I added these lines to the start of the file:
master: 192.168.88.101
id: renki1
I restarted the salt-minion service so the changes to the settings take effect.
$ sudo systemctl restart salt-minion.serviceI exited the “renki1” SSH session and connected to “isanta”.
$ exit
> vagrant ssh isanta
I updated packages and installed salt-master.
$ sudo apt-get update
$ sudo apt-get install salt-master
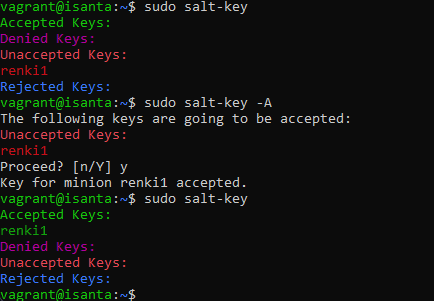
I authorized the slave machine to take orders from the master with salt-key.
$ sudo salt-key -A-Aflag is used to accept keys.
I was able to run commands on the slave machine with Salt.
$ sudo salt '*' cmd.run "echo Hello"Creating a Salt module
Objective: Create the first version of your own Salt module. The mini project must have some sort of use case even if it’s made up. Create a page (Github, Gitlab) for project that outlines the basic information about the project. The functionality of the module must be tested but it doesn’t have to be finished.
I decided to make a module that installs a starter pack of useful programs. View the module in GitHub. Read the report.
Sources
- Tero Karvinen: https://terokarvinen.com/2022/palvelinten-hallinta-2022p2/


